Showing posts with label Roast. Show all posts

Saturday, January 3, 2015

Top 8 Recipes for a Brilliant Sunday Roast

It's the first Sunday of 2015 and there's no better way to spend it than with my favorite Sunday tradition - Sunday Roast. A typical Sunday roast consists of roasted meat, roast potato, vegetables, gravy and Yorkshire pudding.

Here are 8 of my favorite recipes for a brilliant Sunday Roast.


1. Roast Beef

My favorite cut to use when making roast beef is rib eye. Tender and succulent, the whole family loves it.

I usually cook my roast beef to medium rare - the cooking time is 5 mins per 100g at 180°C. Allow to rest for at least 15-20 minutes before carving.

For roast beef recipe, see here.


2. Roast lamb

Roast leg of lamb is great if you're feeding a large family. This Heston Blumenthal-inspired recipe is my favorite - simply slow roasted at 90°C for about 2 hours. 


3. Roast lamb loin chops
Baby C's favorite lamb cut is the lamb loin chops. This is much more quicker to cook compared to the whole leg of lamb (20 mins vs 2 hours). 


4. Roast chicken

This is a simple roast chicken recipe from Michelin-star chef Thomas Keller. You only need 4 basic ingredients for this recipe - unsalted butter, salt, pepper and fresh thyme. Moist chicken with incredibly crispy skin.


5. Roast potatoes

A must-have with every Sunday Roast is roast potatoes. Crisp on the outisde, fluffy on the inside - delicious!


6. Yorkshire puddings

We like having Yorkshire puddings with roast beef. They're really easy to make (less than 20 mins for prep and cooking). I love them crispy on the outside and fluffy on the inside, and with lots of gravy poured over.


7. Homemade mint sauce

A good mint sauce is essential when serving roast lamb. I prefer making my own using fresh mint from the garden - so very easy to do. 


8. Vegetables

We like to keep it simple and have our Sunday roast with steamed or boiled vegetables. Two of my favorites are Brussel sprouts and carrots.


If you enjoyed reading my posts, LIKE me on Facebook! You can also follow me on Instagram (@babysumo) for more photo updates. Thanks :)

Wednesday, April 2, 2014

Recipe: Roast Chicken with Indonesian Sweet Tamarind marinade + Healthy Quinoa Salad + WORLDFOODS Giveaway

Thankfully, my kids are pretty adventurous when it comes to food, and whenever I cook them something "new", they will be very excited to try it out. It was chicken drumsticks day again, and this time I am marinating the chicken in a delicious concoction which includes the WORLDFOODS Indonesian sweet tamarind marinade sauce. 


Roasted chicken with Indonesian sweet tamarind sauce


As I read the word "tamarind", my mouth was already watering as I can imagine how appetizing this would taste. Tamarind has a wonderful sweet and sour taste. For the marinade, I also added in some light soy sauce, garlic, grated ginger, coarse black pepper and black treacle (or molasses). The latter gives a nice smoky quality to the roasted chicken.  Simply marinate the chicken for at least 30 minutes, and it's ready for the oven.


The roasted chicken was absolutely fantastic - so flavorful, sticky and juicy. Definitely finger licking good! I served the chicken with a simple quinoa salad, which is both healthy and easy to put together.


I had some leftover sauce, so a couple of days later, I used it in my stir fry chicken dish. Really simple and scrumptious too! This sauce is definitely versatile, and full of flavour - 1 bottle of sauce for 2 meals for a family of 4 is definitely good value for money.

Stir fried chicken with WORLDFOODS Indonesian tamarind sauce


GIVEAWAY!
Once again, thanks to WORLDFOODS, I have 2 bottles of this Indonesian sweet tamarind marinade sauce to giveaway. All you need to do is leave a comment below stating "I want to enter this giveaway" with your name and e-mail address. This giveaway is open to Malaysia only. 2 winners will be drawn (1 bottle each) at random on 9 April 2014 and notified via email. Those who have entered previously can enter again :)

And the winners of the giveaway are: Esther (No.7) and Loh Sook Peng (No.11). Thanks to all who entered! Please reply to the email that I have sent to you.


Note: WORLDFOODS products are food allergens free, trans-fat free and gluten free with no artificial preservatives, coloring or flavouring, as well as being suitable for vegetarians, vegans, coeliacs and Muslims. In KL, WORLDFOODS products are available at Village Grocer (Bangsar Village 1, Sunway Giza, Mt Kiara), Jaya Grocers (Intermark, Empire Shopping, Plaza Jelutong) and Hock Choon @ Ampang.


Roast chicken with Indonesian sweet tamarind sauce
Recipe by Baby Sumo
Preparation time: 5 minutes
Cooking time: 25-30 minutes
Serves 4-5


Ingredients
6 chicken maryland, separated into drumsticks and thighs, washed and patted dry

For the marinade
1/2 cup WORLDFOODS Indonesian sweet tamarind marinade sauce
1/4 cup light soy sauce
4 cloves garlic, minced
2 tsp grated ginger
1/4 tsp coarse black pepper
2 tbsp black treacle (or molasses)


1. Mix marinade ingredients in a large bowl. Make a few shallow scores on the chicken skin. Place chicken pieces into the marinade, and turn them around so that they are well coated. Leave to marinate for 30 minutes.

2. Preheat oven to 190°C (roast mode). Arrange marinated chicken onto a tray lined with foil, then brush with some of the marinade. Set aside some of the marinade for later. Place tray in oven and cook for 15 minutes, then remove and brush remaining marinade and cook for a further 10-15 minutes, until chicken is cooked and the skin is sticky and crispy.

3. Serve with quinoa salad.


Healthy quinoa salad
Recipe by Baby Sumo
Preparation time: 10 minutes
Cooking time: 15 minutes
Serves 4

Ingredients
100g organic quinoa
1 Japanese cucumber
1/3 carrot
6 cherry tomatoes
A handful fresh parsley
1 tbsp fresh mint
3 tbsp extra virgin olive oil
1 1/2 tbsp white balsamic vinegar
Salt

1. Place quinoa in a fine-mesh strainer and rinse under tap water for 2-3 minutes. Add rinsed quinoa and 200g water to a saucepan and bring to the boil then lower to medium heat. Simmer for 15 minutes, or until the quinoa becomes translucent and the white germ forms a visible spiral on the exterior of the quinoa grain.

2.. Drain well using a fine-mesh strainer, then return the quinoa to pot and cover, letting it fluff up for 10-15 minutes. Mix together the quinoa with all the other ingredients and dress with olive oil and white balsamic vinegar. Season, to taste, with salt and freshly ground black pepper.


Stir fried chicken with Indonesian sweet tamarind sauce
Recipe by Baby Sumo
Preparation time: 10 minutes
Cooking time: 10 minutes
Serves 3-4


Ingredients
1 large piece chicken breast (approx. 500g), cut into small chunks
2 tbsp cooking oil
3 cloves garlic, finely chopped
1 large onion, cut into 1/8ths
2 spring onion, cut into 1 inch lengths
1/3 cup WORLDFOODS Indonesian sweet tamarind sauce
1/8 tsp coarse black pepper
1/2 tsp chicken stock granules


1. In a wok, heat oil over medium high heat. Add the garlic and onion, and cook for about 2 minutes, until the garlic is lightly golden. Add the chicken, and stir fry for about 4-5 minutes, or until cooked through.

2. Add the WORLDFOODS Indonesian sweet tamarind sauce, and stir to coat well. Season with black pepper and chicken stock granules. Add the spring onion and cook for a further 30 seconds. Serve immediately with rice.


If you enjoyed reading my posts, LIKE me on Facebook! You can also follow me on Instagram (@babysumo) for more photo updates. Thanks :)

*This recipe was featured on Asian Food Channel's FB page on 6 April 2014.

Sunday, March 2, 2014

Recipe: Oven-Baked Japanese Chicken Teriyaki

I was flipping through my Japanese Bible cookbook, and saw a recipe for chicken teriyaki. I instantly thought that my kids would like this for dinner. I purchased some chicken maryland (drumsticks for the kids, as usual and thighs for the adults) and instead of cooking it in a frying pan, I adapted the recipe and cooked the chicken in the oven. I do love roasting them in the oven as it is less messy and we also get that nice crispy skin.

Oven-baked chicken teriyaki


The chicken is first cooked for 15 minutes, then the teriyaki sauce is poured over and cooked for a further 15 minutes. By then, the sauce would have thickened up nicely and coats the chicken nicely. Do serve some of the sauce with the chicken - it's really nice! The kids as well as Hubby most definitely enjoyed it :)


A simple meal of chicken teriyaki with rice and a side dish of vegetables :)


Oven-baked chicken teriyaki
Recipe by Baby Sumo, adapted from Japanese Bible
Preparation time: 2 minutes
Cooking time: 30 minutes
Serves 6

Ingredients
6 chicken maryland, separated to thigh and drumsticks
1 tbsp canola oil
1/2 tsp salt

For the teriyaki sauce
1/2 cup cooking sake (Japanese rice wine)
1/2 cup mirin (sweet cooking wine)
1/2 cup Japanese soy sauce
1 tbsp caster sugar


1. Preheat oven to 190°C (roast mode).

2. Place chicken (skin side up) in a single layer in a baking tray. Make a few shallow scores on the chicken skin. Brush oil on the skin and then season with the salt. This will help crisp up the skin.

3. Place tray in oven and cook for 15 minutes. In the meantime, place all ingredients for teriyaki sauce in a bowl and mix well until the sugar has dissolved. Set aside.

4. Remove chicken from oven and pour over the teriyaki sauce. You can flip the chicken pieces over a few times using tongs or chopsticks to ensure that it is evenly coated with the sauce.

5. Put back in oven and cook for a further 15 minutes. To test if the chicken has cooked, pierce the thickest part with a skewer and the juices should run clear. By now, the skin should be a nice dark brown and the sauce would have thickened up.

6. Serve with rice and vegetables, and some of the teriyaki sauce for dipping.


I am submitting this to Cook-Your-Books #10 hosted by Joyce of Kitchen Flavours .


If you enjoyed reading my posts, LIKE me on Facebook! You can also follow me on Instagram (@babysumo) for more photo updates. Thanks :)

*This recipe was featured on Asian Food Channel's FB page on 6 March 2014.

Saturday, February 22, 2014

Recipe: Slow-roasted Leg of Lamb with Garlic & Rosemary (Heston Blumenthal)

We were watching MasterChef Australia one evening, and Heston Blumenthal, one of my favorite British chef came on and showed the contestants how to cook a leg of lamb. On Hubby's birthday this year, he put in a request for Heston's lamb - we've cooked roast leg of lamb before, but Heston's cooking and carving method is slightly different, so I was excited to try it!


Slow-roasted leg of lamb with garlic and rosemary


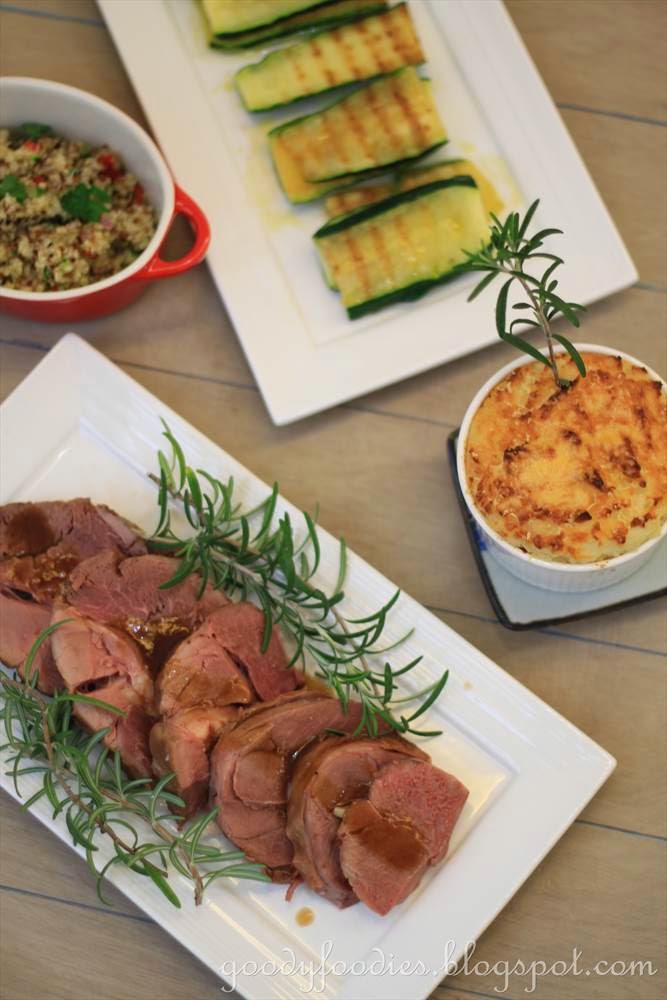
Heston suggests using anchovy fillets,as it gives the lamb a unique savoriness but since this is not something we can get easily from regular supermarkets here, I forego it and settled for garlic and rosemary only, and followed the rest of the recipe. The garlic is blanched in milk first before placed in the leg of the lamb as it gives the garlic a mild, sweet and nutty flavour; if using raw garlic, the taste will be more pungent. If you feel that pouring away 400ml milk just for blanching the garlic is wasteful, then by all means skip this step and just use raw garlic. Personally I feel it won't affect the taste of the lamb much.

The leg of lamb is slow roasted at 90°C until the internal temperature reaches 57°C, this took us slightly over 2 hours for a-2kg lamb. Rest it for 30 minutes in a warm place, before carving.


Now here comes the most important part - carving the meat. This is the key to achieving the extra tender, juicy mouthfeel. The meat has to be cut from the top, downwards until the knife meets the bone, then the knife is run horizontally across the meat, just above the bone. This way you get chunks of meat, rather than slivers. I never would have thought this would make the world of difference, but it does!

This is by far the best of roast leg of lamb I have ever tasted. Beautifully pink meat throughout and slicing it the Heston way makes it taste extra tender and delicious! We served the tender lamb with homemade mint sauce, cheesy mash pots, grilled zucchini, and quinoa salad. Birthday boy was absolutely delighted with the meal.


Slow-cooked roasted leg of lamb with garlic and rosemary 
Recipe by Baby Sumo, adapted from Heston Blumenthal
Preparation time: 10 minutes
Cooking time: 2 hrs 30 minutes
Serves 6-8

Ingredients
2.0kg lamb leg, on the bone
3 tbsp canola oil
400g skim milk
6 garlic cloves, halved
4 rosemary sprigs
Salt, to taste


To serve
Homemade fresh mint sauce
Gravy


1. Preheat oven to 90°C (roast mode).

2. Heat oil in a flameproof roasting pan over high heat until smoking. Season lamb with salt, then sear until completely golden brown. Place a roasting rack underneath the lamb set inside the pan.

3. Meanwhile, bring 100g milk to the simmer in a saucepan over medium heat. Add garlic and allow to simmer for 1 minute. Drain through a fine sieve, retaining the garlic, and discarding the milk. Repeat process 3 times using the remaining milk.

4. Cut blanched garlic into slivers. Using a sharp knife, cut small slits in the surface of the lamb at regular intervals. If necessary, use a small spoon to enlarge holes. Fill holes with an anchovy slice, a garlic sliver and a few rosemary leaves.


5. Place lamb in oven for 2 - 2 1/4 hours or until internal temperature reaches 57°C.

6. Remove lamb from oven, wrap in foil, and set aside to rest for at least 30 minutes.

7. Meanwhile, place roasting pan over medium heat. Add a splash of white wine to deglaze, whisk in mustard and stock, then reduce to a saucy consistency. Pour into a warm jug.

8. To serve, remove foil, and place lamb on a chopping board. Cut meat from the top, downwards, until the knife meets bone, to desired thickness, all the way along the top of the leg. Run the knife horizontally across the meat, just above the bone, separating the slices. Turn over and repeat on other side.


9. Arrange lamb on a platter and serve with side dishes of your choice. We served with homemade mint sauce, cheesy mash pots, grilled zucchini, and quinoa salad (recipe here).


If you enjoyed reading my posts, LIKE me on Facebook! You can also follow me on Instagram (@babysumo) for more photo updates. Thanks :)

*This recipe was featured on Asian Food Channel's Facebook page on 17 December 2014.

Saturday, February 8, 2014

Recipe: Crispy-skin Chinese Roast Duck 烤鸭

So far this year, I have had great success in the kitchen trying to cook/make something for the first time, including Chinese roast pork (siew yuk) and pineapple nastar rolls. So happy that I can now add crispy-skin Chinese roast duck to the list!


We are always on the hunt for decent roast duck in KL. Our criteria for a good roast duck is crispy skin plus flavorful, juicy meat. Not difficult, right? When we were at the supermarket last week, Hubby saw ducks for sale and said, "Wanna make roast duck for Chinese New Year?". Challenge accepted.


Glistening, gloriously crispy skin


To achieve crispy skin on the duck, it is important that the skin is very dry before roasting. Initially, I was a little apprehensive about sun-drying the duck as I was worried it would attract flies and other insects. Fortunately, no such problem plus with the very hot weather during CNY, it didn't take long for the skin to dry. Both my kids found it a funny sight to see the duck sunbathing in the garden ;)

In between the sunbathing sessions, the duck also needs to be "bathed" in a mixture of maltose and rice vinegar. Once the skin is dry, simply stuff the cavity with the seasoning and put in the oven to roast. There is no need to leave the meat to marinate - easy! One reason why I've never attempted making roast duck until now, is that I was under the impression that it makes a lot of mess in the oven, however after making it I can now say that roasting duck is pretty mess-free (even less oil splatter than making siew yuk- the oil just drips onto the tray).


Our duck sunbathing in the garden.... enjoying the scenery with a bottle of Moet LOL!!


It didn't take long for the skin to brown in the oven and soon, we had a beautiful, glistening roast duck at the dinner table. I served it with oiled rice and 3 types of sauce - homemade chilli sauce (recipe here), plum sauce (store-bought) and the duck gravy (which you pour out from the cavity). The roast duck was simply sensational - it ticked all the boxes for a fantastic roast duck - crispy skin, flavorful, moist and juicy.

I was really happy to see my family enjoying this so much. Hubby commented that this is far better than a lot of those being sold outside. I would definitely make this again - though there is a long waiting time (to sun-dry the duck), the actual work that goes into this is pretty minimal. Easy and delicious!


Fantastic roast duck!


Love love love this!


Crispy-skin Chinese roast duck 烤鸭
Recipe by Baby Sumo, adapted from Nasilemaklover
Preparation time: 15 minutes (plus 3-4 hours for drying)
Cooking time: 55-60 minutes
Serves 4-5

Ingredients
1 whole duck (2.5kg)
3 cups water
2 tbsp maltose
1 tbsp rice vinegar

Seasoning
3 tbsp fermented soybean paste (taucu)
1/2 tsp Chinese five Spice powder
1 1/2 tsp salt
1 tsp pepper
2 tsp caster sugar

4 shallots, blend into paste
4 cloves garlic, blend into paste


To serve
Rice (4 pax)
2 tbsp shallot oil (recipe here)
Chicken stock

1 Japanese cucumber, sliced

The sauces
Homemade chilli sauce (recipe here)
Plum sauce (store-bought)
Gravy from duck


1. Wash the duck well and remove any visible hairs. Pat dry with a kitchen towel.

2. In a large wok, combine water, maltose and vinegar and bring to a boil. Once boiling, turn off the heat. Place the duck into the wok and bath the duck with the mixture several times. (ie use a ladle and scoop the mixture all over the duck).

3. Sun-dry the duck for 2 hours. I placed a bottle in the duck's cavity so that it can stand upright and get even sunning. You can also get a hook to hang the duck (around the neck), whatever works. After 2 hours, bring the mixture in the wok to a boil again. Once boiling, turn off and bath the duck again and then sun-dry for 1-2 hours until a dried skin is formed. (weather-dependent - it is done once the skin is hard to the touch).

4. Combine the seasoning with the blended shallots and garlic in a bowl, and mix well. Spread the seasoning in the duck's cavity only (make sure you spread it around well). Do not rub the mixture over the outer skin.

5. Preheat oven to 190°C (roast mode). Place the duck on a wire rack, with a tray underneath to catch any oil drippings. Cook for 55-60 mins until the skin is brown and crispy. Do remember to turn the duck around half way through for even browning of the skin.

6. Once ready, remove from oven and pour the gravy out from the duck cavity. Try not to get it onto the skin as it will make the skin lose its crispiness.  Allow to rest for 10 minutes, then chop into bite-size pieces using a meat cleaver. Serve with white rice, oiled rice or noodles and sliced cucumbers.

7. To make oiled rice, simply cook as you would normal white rice but replace water with chicken stock and add in 2 tbsp of shallot oil. The rice will have a lovely fragrance once ready.


During CNY, ducks are often served as it symbolises fertility


If you enjoyed reading my posts, LIKE me on Facebook! You can also follow me on Instagram (@babysumo) for more photo updates. Thanks :)


*This recipe was featured on Asian Food Channel's FB page on 15 February 2014.