Showing posts with label Baking. Show all posts

Sunday, October 12, 2014

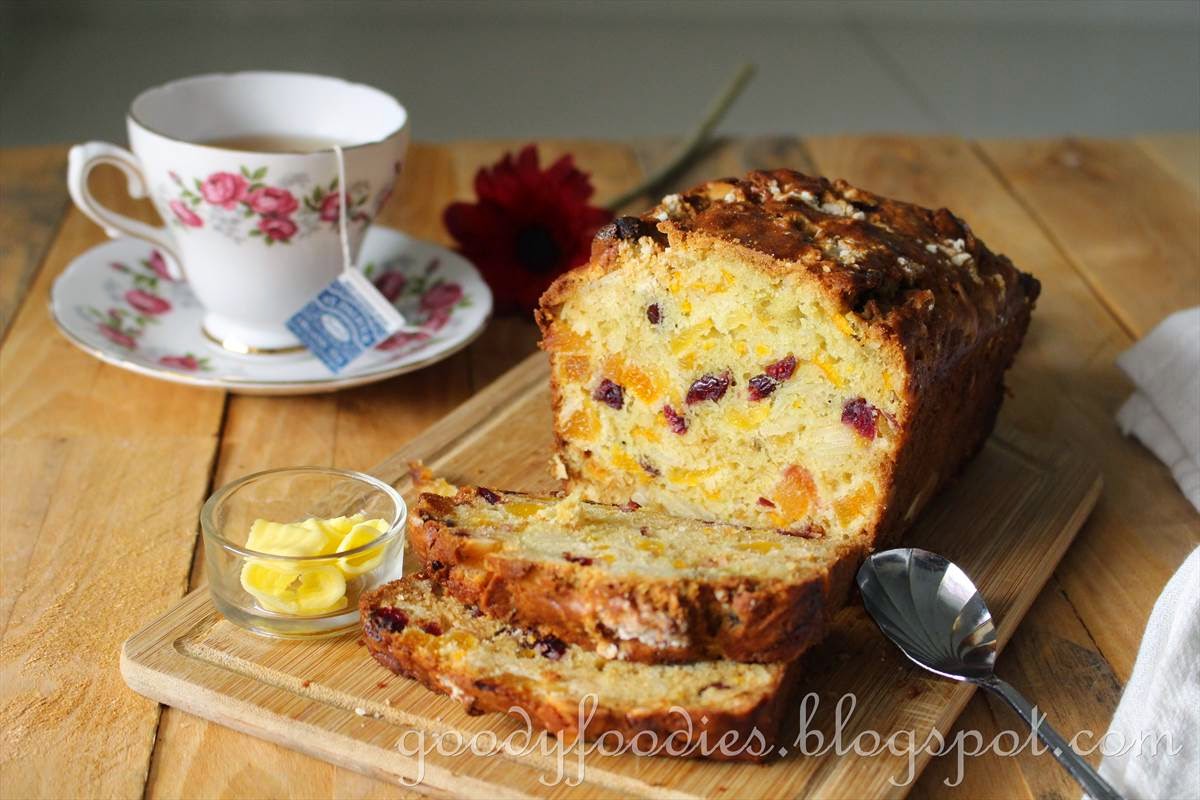
Recipe: Apricot, Cranberry & Nut Loaf

You should see my boy's face all lit up when I picked him up from school and told him that we were baking a loaf/cake. It's one of his favorite afternoon activities, spending the afternoon in the kitchen with me.


Today we are baking an apricot, cranberry and nut loaf - an easy and quick kids-friendly recipe as it only requires measuring out the ingredients and mixing it in a large bowl with a wooden spoon. For this loaf, you can use any of your favorite dried fruits or nuts.

The batter is then poured into a loaf tin and baked for 55-60 minutes. We let it cool a little before we had a few slices for tea time. And boy, was it delicious!

This would be perfect for Christmas!

Mmmmm it sure smells good, says baker boy!


A really moist loaf, studded with our favorite fruits and nuts. The orange rind lends a lovely aroma to this loaf. We like eating this loaf warm, but it is also very good once cooled completely. Good with a cuppa tea or coffee, and slather on some extra butter if you like. :)

Thanks Baby D for making this wonderful loaf for the whole family!


A couple of announcements - For the whole month of November 2014, Zoe from Bake for Happy Kids, Grace from Life can be simple and I (Yen) from Eat Your Heart Out will be cooking and baking Bobby Flay's recipes for "Cook Like a Star" event.

Zoe from Bake for Happy Kids, Diana from The Domestic Goddess Wannabe and I will be hosting a Christmas event for the whole month of December and a Chinese New Year (CNY) event for the whole month of February 2015. Do join us and hope to see your recipes then! :)


Apricot, cranberry and nut loaf
Recipe by Baby Sumo, adapted from Baking cookbook
Preparation time: 10 minutes
Cooking time: 55-60 minutes
Makes 1 loaf


Ingredients
115g dried apricots, roughly chopped
1 large orange
85g dried cranberries
100g caster sugar
85ml oil
2 eggs, lightly beaten
250g plain flour
2 tsp baking powder
1/2 tsp salt
1 tsp baking soda
55g almond flakes

1. Preheat oven to 180°C (no fan). Grease and base-line a 9x5 inch loaf tin with baking paper.

2. Using a vegetable peeler, remove the orange rind only. Then, finely chop the orange rind with a sharp knife. Place into a bowl with the cranberries and apricots.

3. Squeeze the peeled orange. Place into a measuring jug, then top up with hot water to obtain 175ml liquid.

4. Pour the orange juice mixture (from Step 3) into the apricot mixture (from Step 2). Stir in the sugar, oil and eggs. Set aside.

5. In another bowl, sift the flour, baking powder, baking soda and salt. Fold the flour into the apricot mixture (from Step 4) in 3 batches.

6. Stir in the almonds.

7. Spoon mixture into prepared tin, and bake in preheated oven for 55-60 minutes, or until a skewer inserted in centre comes out clean. If the loaf browns too quickly, then protect the top with a sheet of foil. Allow to cool in tin for 10 minutes, then turn out to a wire rack to cool completely.


Note: For younger kids, you can help them with peeling and chopping the orange rind.


Been drinking St. Dalfour's organic peppermint tea lately, and really love it!


*I am linking this to Cook-Your-Books #17 hosted by Joyce of Kitchen Flavours.


If you enjoyed reading my posts, LIKE me on Facebook! You can also follow me on Instagram (@babysumo) for more photo updates. Thanks :)

Thursday, July 17, 2014

Recipe: Plain White Loaf (Wu Pao Chun Champion Toast 金牌土司)

Every year, I make a resolution to make more bread for my family but on the other hand, I have a love/hate relationship with yeast (I don't always have luck with it and sometimes the yeast is dead and our bread doesn't rise and we end up with a brick).

Recently, I saw many of my blogger friends making the plain white loaf (recipe originating from the famous Taiwan's Master Baker Wu Pao Chun), also known as Champion Toast. It looked so good, I knew I had to try it too!

Plain White Loaf.... perfect to be eaten anytime of the day!


Making this bread is very easy as I can use my KitchenAid to knead the dough. The dough rose beautifully, and for the first time, I felt really happy baking bread.


The bread tasted delicious and the texture was great -so soft and fluffy. We bake this almost everyday now, and enjoy this as our daily loaf. Most days though my kids and Hubby would eat almost 3/4 of the loaf before the end of the evening when it's hot out of the oven. That's how much they love it!


My son assists me everyday when he is on school holidays :) My lil baker boy.


Champion Toast... yeah!


This white loaf is perfect for making French Toast. We would always save a couple of slices to make this for breakfast the next day!


Plain white loaf (Wu Pao Chun Champion Toast 金牌土司)
Recipe by Baby Sumo, adapted from here
Preparation time: 15-20 minutes
Cooking time: 30 minutes
Makes 1 loaf (11cmx20cm)


Ingredients
375g bread flour
30g caster sugar
3/4 tsp fine sea salt
20g salted butter, cut into small cubes
1 tsp instant dry yeast
240g cold milk

1. In a mixing bowl, place the flour, sugar and yeast. Mix well. 

2. Then, add in salt and milk to the mixing bowl. Using low speed with hook attachment (speed 1 on KitchenAid) mix into a dough, about 2 minutes.

3. Add in butter, then knead using low speed for another 15-20 minutes until you get a shiny and smooth dough.

3. Shape the dough into a bowl and place back in bowl. Cover the mixing bowl with a cloth and proof until doubled in size, about 1 - 1 1/2 hour. To test if it has sufficiently risen, press a finger into the dough and withdraw it quickly, the indentation should remain.

After first proofing

Test to see if it has sufficiently risen


4. Gently punch the centre of the dough with your first to deflate it. Divide dough into 3 balls. Flatten each ball, then roll into a rectangle shape (like rolling a swiss roll), and place into a lightly greased 11x20cm Pullman tin. Cover and allow to rise in a warm place for another 1 hour, until the tin is 90-95% full.

Place dough into Pullman tin for second proofing


5. Cover the Pullman tin, bake in a preheated oven at 190°C (fan-forced) for 30 mins.

Perfect white loaf for breakfast! This one has got raisins.


Note: If you intend to add filling to the bread such as raisins, cranberries or nuts, add them in Step 4 while you roll the bread into rectangle shape. Also note that it is normal for your Kitchen Aid to be very noisy and hot after kneading for 10 mins.


Bread with Bordier butter = simple irresistible!


Freshly baked, spread with some homemade roselle jam


French Toast with bananas, apricots, caramel sauce and maple syrup. Oh and some crushed Maltesers as well.


If you enjoyed reading my posts, LIKE me on Facebook! You can also follow me on Instagram (@babysumo) for more photo updates. Thanks :)

    Sunday, July 13, 2014

    Recipe: Oven-Roasted Dragon Tiger Grouper 龙虎班 with Lemongrass, Dill and Fennel

    Remember that beautiful dragon tiger grouper 龙虎班 we got from MySeafoodMart.com? It was so fresh, that we decided to cook it there and then.

    Oven-roasted dragon tiger grouper with lemongrass, dill and fennel

    We plucked some lemongrass from our garden, sliced it thinly and stuffed it in the stomach area along with some fresh dill and fennel leaves. I also covered the top layer with lots of sea salt, you can scrape these off later once the fish is ready. Then, the fish is placed in the oven and baked - easy peasy. And while the fish is cooking, I made a simple soy sauce/garlic dip.


    The fish is moist and flaky, and we loved the wonderful aroma of the lemongrass. This would work well with any whole fishes - just adjust the cooking time according to the size of the fish.


    Oven-roasted dragon tiger grouper with lemongrass, dill and fennel
    Recipe by Baby Sumo
    Preparation time: 5-10 minutes
    Cooking time: 30 minutes
    Serves 4

    Ingredients
    1kg dragon tiger grouper, scales and guts removed
    3 stalks lemongrass, thinly sliced or bruised
    A bunch of fennel/dill leaves
    2-3 tbsp oil
    Sea salt

    For the dip
    6 cloves garlic, finely chopped
    3-4 tbsp oil
    3 tbsp light soy sauce


    1. Preheat oven to 200°C (roast mode). Line a baking tray with foil, then using a brush, apply a thin layer of oil.


    2. Place fish on tray, then stuff the stomach area with the lemongrass and fennel/dill. Drizzle more oil on the fish and then cover with a layer of sea salt. The sea salt can be scraped off later once the fish is ready.

    3. Cook in preheated oven for 28-30 minutes, or until a skewer inserted in the thickest part goes all the way through.

    4. Serve with a soy sauce/garlic dip. To make the dip, fry the garlic in oil for 2 minutes until lightly golden. Place oil and garlic in a small bowl, then top with soy sauce. Mix well.

    Note: You can use any whole fish for this recipe.


    If you enjoyed reading my posts, LIKE me on Facebook! You can also follow me on Instagram (@babysumo) for more photo updates. Thanks :)

    Friday, July 11, 2014

    The Great Scott® Calorie Light Challenge + Recipe: Oven-baked buttermilk "fried chicken"

    So, I received an "invitation" to join The Great Scott® Calorie Light Challenge, whereby I have to share a fried chicken recipe, use Scott Calorie Light premium kitchen towel while preparing the dish and then blog about it. Since Scott® is a trusted brand in my household (we are already using the kitchen towels + toilet rolls + tissue), I gladly accepted the challenge.


    Oven-baked buttermilk "fried chicken"


    The new Scott® Calorie Light Premium towel is specifically designed for superior oil absorbency. It is extra thick, with Fiber-Tech Technology and infused with green tea extract for easy and effective absorption of excess oil from surface of foods, which in turn reduce the calories you consume. A research by an independent party found that by using just 3 sheets of Scott® Calorie Light kitchen towel to soak up excess oil from food like fried chicken before serving, the calorie intake from fat is reduced by an average of 25%.


    And now to the fried chicken recipe. As usual, I am oven-baking my "fried chicken" but even with oven-baking, there is still a considerable amount of oil from the chicken skin as well as the oil you drizzle over to get the skin to crisp up nicely. I first marinated the chicken pieces in buttermilk for 6 hours - the buttermilk helps tenderizes the chicken, keeping it moist and juicy in every bite. The chicken is then coated in crushed cornflakes for that crispy outer finish and baked in the oven. Just before serving, I used the Scott® Calorie Light kitchen towel to absorb the excess oil.


    I am definitely very happy with this recipe - the chicken is moist, tender, juicy and flavorful and the skin is lovely and crispy. Kids enjoyed this very much too!

    Now we can enjoy delicious "fried chicken" more often, minus the extra calories ;)


    Oven-baked buttermilk "fried chicken"
    Recipe by Baby Sumo
    Preparation time: 20 minutes
    Cooking time: 25 minutes
    Serves 3-4


    Ingredients
    1 cup milk
    1 tbsp fresh lemon juice
    3 chicken maryland, separated to thigh and drumsticks
    1/2 tsp sea salt
    2 cloves garlic, crushed
    1/4 tsp coarse black pepper

    1/2 cup plain flour
    1/2 tsp smoked paprika
    A pinch of cayenne pepper
    Salt and pepper

    2 1/2 cup cornflakes
    1 egg, beaten
    2 tbsp canola oil


    1. To make buttermilk, place milk and lemon juice into a measuring jug, then leave to stand for 5-10 minutes.

    2. Place chicken in a bowl, then pour over the buttermilk. Add salt, coarse pepper and crushed garlic, and mix well. Cover with cling film and leave to marinate for at least 6 hours.


    3. Preheat oven to 180°C (roast mode). Line a baking tray with greaseproof paper.

    4.  Put flour, paprika, cayenne pepper on a plate, mix, and season with salt and pepper.

    5. Put cornflakes in a plastic bag, then crush using a rolling pin, until fine. Pour onto a plate.

    6. Beat egg in a bowl.

    7. Remove chicken from buttermilk, one piece at a time. Dredge in flour, then dip in egg and finally the cornflakes, making sure it is evenly coated. Repeat for all the chicken pieces.


    8. Place chicken in tray in a single layer, then drizzle over the oil. Cook in preheated oven for 25 minutes until the skin is golden brown and chicken is cooked through. Drain on kitchen towel, to remove excess oil. Serve immediately, with a side salad.


    Remove excess oil before serving


    My healthy fried chicken, made even "healthier" with less calories :)


    If you enjoyed reading my posts, LIKE me on Facebook! You can also follow me on Instagram (@babysumo) for more photo updates. Thanks :)

    *This recipe was featured on Asian Food Channel's Facebook page on 12 July 2014. This recipe was picked as one of the winning entries for this challenge.


    Monday, June 23, 2014

    Recipe: Banana Nut Muffins (Paula Deen)

    It's very rare to find overripe bananas in my house, as my kids will usually finish them a couple of days after we buy them. This time, I hid 2 bananas in the fridge since I wanted to make muffins with them over the weekend.

    Banana Nut Muffins


    Since Cook Like a Star this month is Paula Deen, I searched for a banana muffin recipe and found this. I changed a few things, such as reducing the sugar from 1 cup to 1/3cup (bananas are naturally sweet) plus I substituted 1/4 cup of walnuts with chocolate chips (my kids love them in muffins!). I also used walnuts in lieu of pecans since I have them in the fridge. This is an easy stir-and-bake recipe, so my kids could do it with minimal supervision.


    The muffins were moist, nutty and just right in terms of sweetness. Thank you kids for making them!

    On a separate note, my blog has surpassed 4 million hits today... thanks again for all your support! :D

    Photobombed by a cutie! :D


    Banana Nut Muffins 
    Recipe by Baby Sumo, adapted from Paula Deen
    Preparation time: 15 minutes
    Cooking time: 18-20 minutes
    Makes 12-13

    Ingredients
    2 cups plain flour
    1/3 cup caster sugar
    1 tsp baking soda
    1/2 tsp baking powder
    1/2 tsp ground cinnamon
    1/4 tsp salt
    2 very ripe bananas, mashed (about 1 cup)
    1/2 cup corn or vegetable oil
    2 large eggs
    2 tbsp  milk
    3/4 cup chopped walnuts
    1/4 cup chocolate chips


    1.Preheat oven to 200°C (no fan) . Line a 12-cup muffin pan with paper liners.

    2. In a large bowl, combine flour, sugar, baking soda, baking powder, cinnamon, and salt.

    3. In a separate bowl, combine banana, oil, eggs, and milk. Add the wet mixture to flour mixture, stirring until just incorporated. Stir in walnuts and chocolate chips.

    4. Spoon batter into prepared muffin cups. Bake for 18-20 minutes, or until golden brown. Allow to cool on wire rack.


    Note: I reduced sugar from 1 cup to 1/3 cup and replaced 1/4 cup of walnuts with chocolate chips. You can also use pecans.


    Loving my new mini mason drinking jar :)


    I am linking this to Cook like a Star (Paula Deen and Deen brothers theme) organised by Zoe of Bake for Happy Kids, Joyce from Kitchen Flavours and Diana from Domestic Goddess Wannabe.


    If you enjoyed reading my posts, LIKE me on Facebook! You can also follow me on Instagram (@babysumo) for more photo updates. Thanks :)

    Thursday, June 19, 2014

    Recipe: Grandma Paul's Sand Tarts (Paula Deen)

    After seeing Paula Deen's sand tarts on Zoe's blog, I immediately felt the urge to make them for my kids. I quickly went downstairs to take the butter out of the fridge for it to soften. Unbelievably easy to make with only 4 ingredients - butter (I use salted), icing sugar, plain flour and ground almonds (my choice of nuts since I had no pecans at home).


    Grandma Paul's Sand Tarts


    I did a little research online, and found out that sand tarts are a popular Christmas cookie. The ingredients also seem pretty similar to polvorones (aka Mexican wedding cookies in US).

    To make these sand tarts, the softened butter is simply beaten with the icing sugar, then the flour and ground almonds are folded in, and they're ready for shaping into crescents. These sand tarts are slowly baked in the oven at a low temperature, and the resulting cookie is buttery, tender and melt-in-the-mouth. They're also not too sweet, unlike most American cookies.


    I am definitely glad that I made them, as they're simply delicious. My kids were delighted when they got to have these as their evening treat. As soon as the photos were taken, their little hands shot to the plate and grabbed a cookie :P


    Is it good? My boy's expression says it all! Next time, I'm making a bigger batch!


    Grandma Paul's Sand Tarts (Paula Deen)
    Recipe by Baby Sumo, adapted from Bake for Happy Kids & Food Network
    Preparation time: 20 minutes
    Cooking time: 40 minutes
    Makes 15 cookies

    Ingredients
    120g salted butter, softened at room temperature
    40g icing sugar, plus 20g more for coating & dusting cookies
    130g plain flour, plus extra for dusting hands
    60g ground almonds
    1/2 tsp vanilla extract (optional)


    1. Preheat oven to 270°F / 130°C (no fan). Line baking tray with baking paper.

    2. Using an electric mixer at low speed or a wooden spoon, beat the butter, vanilla extract(if using) and sugar until smooth. Then, add in the flour and ground almonds and mix well, until you get a rough dough.

    3. With floured hands, take out a tablespoonful of dough and shape it into crescent. Coat the cookies with extra icing sugar and place the cookies about 1 inch apart on the prepared baking tray. Continue to dust your hands with flour as you make more cookies.


    4. Bake for 40 mins, it is normal for them to look pale yellow. Dust with 1/2 tablespoon of icing sugar while still warm. Cool completely on wire racks and store in airtight containers.


    Note: You can use other finely chopped nuts such as walnuts or pecans as per original recipe.


    Cute boy enjoying his sand tarts


    I am linking this to Cook like a Star (Paula Deen and Deen brothers theme) organised by Zoe of Bake for Happy Kids, Joyce from Kitchen Flavours and Diana from Domestic Goddess Wannabe and to Little Thumbs Up (June 2014: Butter) hosted by Jozelyn of Spice Up My Kitchen.


    If you enjoyed reading my posts, LIKE me on Facebook! You can also follow me on Instagram (@babysumo) for more photo updates. Thanks :)