Showing posts with label cheese. Show all posts

Tuesday, November 4, 2014

Recipe: Spaghetti Pasta with Zucchini, Crispy Bacon & Parmesan

My kids love pasta, so much so that it has become a weekend staple in our home. Their favorite pasta is spaghetti and I am often surprised at how much they can eat.


Scenario #1
Mummy: "Kids, do you want to go out to the mall and eat some nice food?"
Kids: Mummy can we stay home, and can you make us pasta for lunch?

Scenario #2
Mummy: Do you want to go for dim sum today? (Note: They love siew mai)
Kids: Don't want siew mai.... can we have pasta instead.... the one with the bacon, pleaseeeeee?

Scenario #3
Mummy: Do you want mummy to cook something else for a change?
Kids: Nooooooo, we want pasta. Mummy's pasta is the best.

That's basically how it goes every weekend. My kids will request for pasta every weekend. As a mummy, I'm only glad to see them eating well and enjoying their food. :)


Here's the recipe for their (current) favorite pasta, spaghetti with zucchini and bacon. It's one of those pasta dishes that everyone loves. Simple and quick to make too.


Spaghetti pasta with zucchini and bacon
Recipe by Baby Sumo
Preparation time: 10 minutes
Cooking time: 10-12 minutes
Serves 4

350g spaghetti pasta
5 streaky bacon (about 125g), sliced thinly
1 zucchini (about 300g), sliced thinly
4 cloves garlic, finely chopped
3 tbsp extra virgin olive oil
Salt and freshly ground black pepper
Freshly grated Parmesan, to garnish
Fresh parsley or basil (optional)


1. In a pot of salted water, cook the spaghetti pasta according to pack instructions, about 8-10 minutes until al dente. Remove from heat and drain, run under cold water to stop from cooking further.

2. Heat the olive oil in a large frying pan or wok on medium high heat. Add bacon and cook for 3-4 minutes, until crispy and golden brown. Remove and set aside.

3. Using the same pan, add the garlic and cook for a minute until golden brown. Then, add the zucchini, and cook for 3-4 minutes until it turns translucent. Add the drained pasta, season with salt and pepper as necessary and give it a quick stir.

4. Using a two-pronged carving fork, swirl some of the pasta around the fork. Slide the pasta off the fork and mound it in the center of a plate. Repeat for each serving. Top with crispy bacon, as well as parsley and basil (if using). Grate Parmesan cheese all over.


If you enjoyed reading my posts, LIKE me on Facebook! You can also follow me on Instagram (@babysumo) for more photo updates. Thanks :)

Tuesday, May 13, 2014

Recipe: Asparagus and cheese muffins + Asparagus ends soup

After a few days of eating asparagus, I've gathered up quite a lot of asparagus ends (which I usually throw away because they're woody and fibrous).  I've always felt that it's wasteful to throw them away, so this time I will be making a soup with them.

To go with the asparagus soup, I've also made some savoury asparagus and cheese muffins. The original recipe uses Cheshire cheese, which I couldn't find in the supermarkets here, so I substituted with Cheddar cheese. These were really easy to make, a simple mix-and-bake recipe.


This is only my second time making savoury muffins, but we really enjoyed them. I was especially surprised that Baby D ate 2 whole ones (cheese-lover!). I like how the asparagus stems peek out of the muffins, which gives it an elegant appearance. These muffins were moist, with a lovely top crust and pretty substantial. They're best eaten warm with some cold butter.


For the soup, the asparagus ends are boiled with the chicken stock, and then pureed using a hand blender. This then needs to be sieved to remove the inedible fibrous bits. Using asparagus ends, the soup was pale green in colour (my head went "oh-no!") - I've made asparagus soup before with the stalks and it was a vivid green. I googled and saw other asparagus ends soup images which was a similar shade, so this colour is perfectly normal... phew.

Despite the colour, the asparagus flavours really came through. The soup was silky smooth, creamy and comforting. So next time, don't discard those woody ends... they make a good asparagus soup.


Asparagus and cheese muffins
Recipe by Baby Sumo, adapted from Good Food Channel
Preparation time: 15 minutes
Cooking time: 25-30 minutes
Makes 9

Ingredients
9 asparagus, woody ends removed, stems cut into 1cm pieces, leave the tips a little longer
200 g self-raising flour
100 g cheddar cheese
62g butter
1 spring onion (green parts only), snipped
75ml milk
50ml natural yogurt
1/2 tsp English mustard
1 egg


1. Preheat the oven to 200°C (no fan) and line a muffin tin with 9 cases.

2. In a large bowl, mix the flour with the cheese. Melt the butter and pour into a jug. Add the spring onions, milk, yogurt, mustard and eggs into the melted butter. Mix well until combined and season generously with salt and pepper.

3. Gently fold the wet ingredients into the flour and cheese, and stir in the chopped asparagus stems. Be careful not to over mix and stop as soon as the mixture is combined.

4. Spoon the mixture evenly between the muffin cases and push an asparagus tip into the middle of each. Bake in the oven from 25-30 minutes until golden. Best eaten hot out of the oven, spread with a little cold butter.


Note: I halved the original recipe, to yield 9 muffins. I could not get Cheshire cheese here, so I substituted with Cheddar cheese.


Creamy asparagus ends soup
Recipe by Baby Sumo, adapted from here
Preparation time: 10 minutes
Cooking time: 20-25 minutes
Serves 2

Ingredients
300g asparagus ends
2 cups chicken or vegetable stock
1 onion, finely chopped
Salt
2-3 tbsp cream
A knob of butter

To serve (optional)
Asparagus tips
Parmesan cheese
Bacon


1. In a saucepan over medium heat, melt the butter and add onions and cook for 2 minutes until they have softened. Make sure that they do not brown. 

2.Then, add the chicken stock and asparagus ends and cook for 15 minutes until softened.

3. Remove from heat and use a hand blender to puree the asparagus ends. Pass the soup through a sieve to remove the inedible fibrous bits. Place back into saucepan, and season with salt and pepper, simmer at very low heat and add the cream. Serve immediately.


* I'm linking this post to Little Thumbs Up (May 2014: Milk) hosted by Tze of Awayofmind Bakery House.


If you enjoyed reading my posts, LIKE me on Facebook! You can also follow me on Instagram (@babysumo) for more photo updates. Thanks :)

Saturday, April 19, 2014

Recipe: Grilled Zucchini + Cheesy Mashed Potatoes

Happy Easter everyone!

We had a great morning hunting for Easter eggs as well as eating chocolate eggs and hard boiled eggs, and we're looking forward to lamb chops for dinner :) 

For today's post, I want to share the recipes for the side dishes that I served with my slow-roasted leg of lamb - grilled zucchini and cheesy mashed potatoes.


Zucchini or courgette is one of my favorite vegetables, and we buy this every week, be it for a pasta dish or as a side dish. This time, I decided to slice it to about 1cm thickness and then grill it for 3 minutes each side. Make sure the grill pan is really hot, so that you get these lovely grill marks on the zucchini. Really simple and delicious!


I made too much mashed potatoes for dinner the previous night, so the leftovers were placed in ramekins and topped with mozzarella and cheddar cheese and baked until the crust is a lovely golden brown. Rich, fluffy cheesy mashed potatoes. :) 


My Easter Helpers :D


Grilled Zucchini
Recipe by Baby Sumo
Preparation time: 5 minutes
Cooking time: 6 minutes (per batch)
Serves 4

Ingredients
2 zucchini, halved then cut into 1cm slices
3 tbsp olive oil
3 garlic cloves, crushed
1/2 tsp dried parsley
Salt

1. Place crushed garlic cloves, olive oil and parsley in a bowl and set aside for 5-10 minutes to infuse. Add zucchini and toss to coat and season with salt.

2. Place the zucchini in a very hot grill pan and grill for 3 minutes each side. Remove and serve immediately.


Cheesy Mashed Potatoes
Recipe by Baby Sumo
Preparation time: 10 minutes
Cooking time:  45 minutes
Serves 4

Ingredients
4 large Russet potatoes, peeled and cut into small chunks
3-4 tbsp of butter
1 tbsp milk
Freshly ground salt and pepper
3-4 tbsp mozarella and cheddar cheese


1. In a pot of salted water, boil the potatoes for 15-20 minutes or until soft. Drain and mash (using a potato press) with some butter and milk. Season with salt and pepper.

2. Place mashed potatoes in ramekin, filling about 85% full (you should need 2), and bake in a preheated oven (210°C) for 25-30 minutes until the top is golden.


If you enjoyed reading my posts, LIKE me on Facebook! You can also follow me on Instagram (@babysumo) for more photo updates. Thanks :)

Sunday, March 23, 2014

The Beato Seakhouse, Jalan Telawi 3, Bangsar, KL

I'm so glad Hubby and I share the love for STEAKS. During our last date night, we visited The Beato Steakhouse for some dry-aged steak action.


The Beato Steakhouse has 2 outlets, one in Publika and another at Bangsar. The Bangsar outlet is located next to Pappa Rich , on top of a vegetarian restaurant. The interior is simple and tasteful, with tables in the centre and a few booths at the side. The booths provide pretty good privacy for a romantic dinner. :)

Service here is polite and friendly. As soon as we were seated, we were handed a 1-page menu and a blackboard was placed before our table to show us what cuts (with respective weights) were available for the day. Beato specialises in dry-aged steaks, whereby the steaks are aged for a few weeks in a custom-made chiller and the resulting crust is trimmed off. During this aging process, the juices are absorbed into the meat making it more flavorful and tender.


Diners can choose from dry-aged porterhouse (RM37/100g), T-bone (RM26/100g), rib eye (RM38/100g), sirloin (RM32/100g), or wet aged tenderloin (RM60/100g). There are also fish courses or lamb available but we both went for the steaks, ordering the 385g ribeye (medium rare) and 415g sirloin (medium). Since the steaks we ordered were pretty sizeable, we decided to skip starters.


Iced peach tea (served with an ice ball) and some complimentary bread with olive tapenade/butter

When our steaks arrived, we both agreed that it looked very "sexy" - for us a good steak does not need many sides or sauces and we like how it is served naked with some roasted garlic and coarse sea salt.The steaks also had a very nice crust. We were served 3 types of mustard to go with our steak. We ordered 2 side dishes - sweet potato fries (RM14) and grilled asparagus (RM13). 


The manager came over to check if we were happy with the steak doneness, and yes, we were. Mine was cooked to a perfect medium. We found out from the manager that all their beef are from Australia and are grain-fed. The steaks were really flavorful and juicy. I also love love love the sweet potato fries, so crispy with a lovely natural sweetness.


Lovely crust!


I'm sexy and I know it ;)


My sirloin, all 415g of it!


Perfect medium doneness


Sweet potato fries- not to be missed!

Although I was pretty stuffed by the time I finished my steak, Hubby ordered a five-kind cheese platter (RM39) to share. We thought this was pretty good value, with a nice selection of cheese - Camembert, Brie, Blue Cheese, Gruyere and Cream Cheese.


Verdict: Overall, a fantastic steak dinner. Would definitely return :)

Opening times: Weekdays 5pm-12am.Weekends only 12pm-12am.

Service: Good.

Price: Total bill RM400 approx.

Location: The Beato Steakhouse, 24-1 Jalan Telawi 3, Bangsar Baru, 59100 Kuala Lumpur.

Tel: 03-2202 2405

Website: https://www.facebook.com/BeatoKL


If you enjoyed reading my posts, LIKE me on Facebook! You can also follow me on Instagram (@babysumo) for more photo updates. Thanks :)

Tuesday, March 18, 2014

Recipe: Homemade Pork Tacos with an Asian Twist + WORLDFOODS giveaway

A taco is a traditional Mexican dish consisting of a corn or wheat tortilla with a variety of fillings, such as beef, pork, seafood, vegetables and cheese. Recently, we have been buying quite a lot of wholemeal tortilla (for our "pizza" bases) and Hubby saw on Instagram that we could also make hard-shell, U-shaped taco shells with them. Of course you can buy ready-made taco shells but they usually come in a box of 12s and it's hard to finish them all before they lose their crunchiness (and some are already broken while being transported around). 


Homemade Pork Tacos with an Asian Twist


The solution - make your own taco shells. It's really simple - just drape the tortilla sheet over 2 bars of your oven rack and bake for 7-8 minutes until crispy and hard. This way, you only make what you need. Since a whole tortilla sheet may be too big, you can opt to cut it in half before draping for daintier shells.


For the filling, we decided to give it an Asian twist, by stir frying the minced pork with the WORLDFOODS Thai green curry paste. We also topped it with scrambled eggs to add creaminess to the taco. Other garnishes include chopped cherry tomatoes, mozzarella cheese, parsley and some Asian pickled green chillies (you can also use jalapenos).

And what a delicious taco it was! Well-balanced textures and flavours - sweet, sour, salty, crunchy and creamy, all in one bite :). And such pretty colours too!


GIVEAWAY!
Thanks to WORLDFOODS, I have 2 bottles of this Thai green curry sauce to giveaway. All you need to do is leave a comment below stating "I want to enter this giveaway" with your name and e-mail address. This giveaway is open to Malaysia only. 2 winners will be drawn (1 bottle each) at random on 26 March 2014 and notified via email. Those who have entered previously can enter again :)

Note: WORLDFOODS products are food allergens free, trans-fat free and gluten free with no artificial preservatives, coloring or flavouring, as well as being suitable for vegetarians, vegans, coeliacs and Muslims. In KL, WORLDFOODS products are available at Village Grocer (Bangsar Village 1, Sunway Giza, Mt Kiara), Jaya Grocers (Intermark, Empire Shopping, Plaza Jelutong) and Hock Choon @ Ampang.


And the winners of the giveaway are: Winnie (No.11) and Emily Ang (No.6). Thanks to all who entered! Please reply to the email that I have sent to you.


Homemade Pork Tacos with an Asian Twist
Recipe by Baby Sumo
Preparation time: 10 minutes
Cooking time: 10-12 minutes
Serves 2

Ingredients
2 tortilla wraps or store-bought taco shells
200g minced pork (or chicken)
2 cloves garlic
1 1/2 tbsp cooking oil
1/8 tsp salt
2-3 tbsp WORLDFOODS Thai green curry paste

For the scrambled eggs
2 large eggs
1 tbsp butter
Salt and freshly ground pepper
1 tsp milk/cream

Garnish
2-3 tbsp pickled green chillies or Jalapeno
6-8 cherry tomatoes, chopped
3-4 tbsp grated mozzarella cheese
Fresh parsley, leaves plucked

1. Preheat oven to 190°C. Drape each tortilla over two bars of your oven rack and bake for about 7-8 minutes or until crispy.

Make your own taco shells! :)


2. Using a frying pan, heat cooking oil over medium high heat. Add garlic and fry for 2 minutes, until lightly browned. Add the minced pork and fry for about 5 minutes, until the pork is golden. Finally, stir in the WORLDFOODS Thai green curry paste and stir well for another minute until the pork is evenly coated. Taste, and season with salt as necessary. Set aside.

3. In a separate pan, break the eggs and add half the butter. Over medium low heat, use a spatula to stir the eggs to combine egg. Keep stirring (as you would when cooking a risotto - do not stop stirring). Add the remaining butter as the mixture begins to set. Do not let it get too hot, you will need to move the pan on and off the heat - about 2-3 times. The eggs will take about 3-4 minutes to cook. Add the milk/cream (it brings the temp of the eggs down hence stops the cooking process via residual heat) and season the eggs with salt and pepper.

4. To assemble, first place half the cooked minced pork (from Step 2) into each shell. Next, layer the cherry tomatoes, followed by the scrambled eggs (from Step 3). Top with mozzarella cheese, Asian pickled green chillies and fresh parsley. Tuck in!


If you enjoyed reading my posts, LIKE me on Facebook! You can also follow me on Instagram (@babysumo) for more photo updates. Thanks :)

*This recipe was featured on Asian Food Channel's FB page on 26 March 2014.

Monday, March 10, 2014

Recipe: Quick & Healthy Breakfast Pizzas

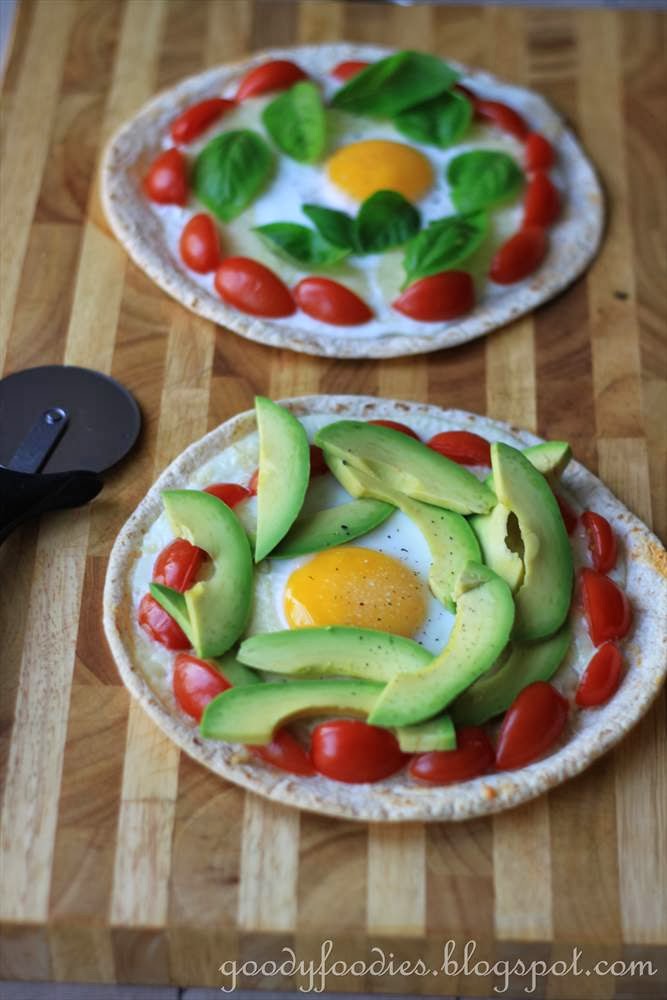
How often do you eat something two days in a row because you liked it so much? Hubby first made these breakfast pizzas for me last Wednesday and the next day, I asked him to make it again. These are seriously delicious, easy to put together and healthy too! A fantastic way to start the day, for sure :)


Quick and healthy breakfast pizzas


For our breakfast pizzas, we used tortilla wraps, then topped it with mozzarella cheese and sliced cherry tomatoes. An egg is then broken into a well in the centre, and then the pizza is placed in a 180°C oven for 10-12 minutes, until the egg is cooked. Personally, I like it with a slightly soft yolk (but not runny as it would be too messy to eat). It is then topped with either fresh basil leaves or avocados. The former is a classic combination of cheese, tomatoes and basil..... really tasty! A touch of truffle oil completes this mouthwatering breakfast pizza.


Tangy tomatoes, melting savoury cheese, soft egg yolk and fresh basil leaves from the garden .. so good!

We also bought some avocadoes last weekend, so we sliced them up and scattered them over the breakfast pizzas. This would also be great for brunch or lunch. 


Sunrise in KL


Quick & Healthy Breakfast Pizzas
Recipe by Baby Sumo 
Preparation time: 2 minutes
Cooking time: 10-12 minutes
Serves 2-3

Ingredients
Version 1:
1 wholemeal tortilla wrap
4-5 cherry tomatoes, quartered
Mozzarella cheese
Parmesan cheese (optional)
1 egg
Salt and freshly ground pepper
6-8 sweet basil leaves
Truffle oil

Version 2:
1 wholemeal tortilla wrap
4-5 cherry tomatoes, quartered
Mozzarella cheese
Parmesan cheese
1 egg
Salt and freshly ground pepper
1 ripe avocado, peeled and sliced
1 calamansi lime (limau kasturi)


1. Preheat oven to 180°C. Place tortilla wraps on a baking tray lined with baking paper. Top with generous amounts of mozzarella cheese onto the pizzas. Make a well in the centre, and break egg into centre. Arrange cherry tomatoes around the pizza.

2. Bake in preheated oven for 10-12 minutes, or until the egg is cooked to your liking. Grate Parmesan cheese over the pizza and garnish with fresh basil leaves or sliced avocados. Season the eggs with some salt and freshly ground pepper and drizzle with truffle oil. Serve immediately.

Note: See here on how to pit and peel an avocado (Step 3 under recipes). Once you have peeled and sliced it, squeeze the calamansi lime over it to stop the avocado from browning.


If you enjoyed reading my posts, LIKE me on Facebook! You can also follow me on Instagram (@babysumo) for more photo updates. Thanks :)

*This recipe was featured on Asian Food Channel's FB page on 12 March 2014.