Saturday, March 22, 2014

Recipe: Quick & Easy Butter Oat Prawns

King prawn is my second favorite seafood, coming a close second after scallops. Prawns are always present in my fridge/freezer - I like to use them in cooking because they take only a couple of minutes to cook and with just a few other ingredients and simple seasoning, they can taste so good!

Butter Oat Prawns


I have been meaning to try out "butter oat prawns" after seeing some of my friends cook this. This is a variation of my usual king prawns with garlic butter and curry leaf. For this dish, no prawn peeling is required - just trim the prawn feelers and you're ready to rock! Rolled oats is first toasted with some butter. Then, more butter is used to cook the prawns with garlic, curry leaves and chillies. Definitely sinful!


This is a dish worth getting your hands dirty for and don't be afraid to suck on the shells, which are full of flavour. The toasted oats has a nice nutty flavour and texture, I reckon the more butter you throw in there (if you don't have any health concerns), the better it tastes!


Butter oat prawns
Recipe by Baby Sumo
Preparation time: 10 minutes
Cooking time: 10 minutes
Serves 3-4


Ingredients
400g large prawns (approx 8-9)
90g salted butter
1/2 cup rolled oats
1/2 tsp caster sugar
3 stalks curry leaves, leaves only
1 red chilli, sliced
4 cloves garlic, finely chopped
2 tbsp oil
1 tbsp ginger wine (optional)
1 tsp chicken stock granules


1. In a wok, melt a third of the butter over medium heat, then add the rolled oats and cook for about 3-4 minutes, stirring occasionally, until it is nicely toasted and golden. Add the caster sugar and stir well. Remove from heat and set aside.

2. Heat oil over medium high heat, then add the garlic. Fry for about 1-2 minutes, until golden, then add the curry leaves and fry for a further minute until fragrant. Add the prawns, and cook for 3-4 minutes, until cooked through, then add the remaining butter and stir to coat. Add the chillies and toasted oats from Step 1, and cook for a further 1-2 minutes. Season with chicken stock granules and ginger wine and then serve immediately.


I am linking this to the Little Thumbs up "Prawn" event organised by Zoe from Bake for Happy Kids and Doreen from My Little Favourite DIY, hosted by Food Playground. You can link your posts here.

If you enjoyed reading my posts, LIKE me on Facebook! You can also follow me on Instagram (@babysumo) for more photo updates. Thanks :)

Friday, March 21, 2014

Cooking with Kids - My Top 5 Tips

The school holidays are here again, and a great way to entertain your kids is to spend some time with them in the kitchen, be it cooking or baking. I am always happy to receive emails from my readers, telling me that I have inspired them through my blog to cook more with their kids, as I do with mine.


Often, they would also ask me for tips on how to make cooking/baking enjoyable with their kids. This is the article that I wrote for Great British Chefs last year that covers this topic, along with some updated content. Also, do check out my collection of kids-friendly recipes that you can try out with your kids. If you have any other questions, please drop me an email or a comment below.

****************


The kitchen is my playground and it is a place where I can be creative and de-stress. Now and then, I will invite my two children into the kitchen for a little bit of fun and education. Cooking is a great bonding activity and kids can gain an incredible amount of knowledge as well as building their self-confidence.

Here are my top five tips on how you can involve your kids in cookery.


1. Choose a child-friendly recipe

Leave the elaborate recipes when you have the kitchen to yourself. When cooking with kids, pick a recipe which is age-appropriate. Children should be able to participate in order to enjoy their time in the kitchen. For younger children, start with recipes which involve easy tasks such as beating the eggs, juicing lemons or mixing the batter.

It would also be beneficial to pick a recipe which makes as little mess as possible, to make it less stressful for yourself.

Both my kids can cook scrambled eggs (with supervision) and they often comment that "it tastes better because they cooked it." And the look of satisfaction on their face is simply priceless :)


2. Planning ahead

Set a date and time, preferably when the kids are feeling fresh. Just before naptime is never a good time, as kids tend to be tired and cranky. Once you have set a date, let the kids know --anticipation helps build up the excitement to the day.

If your first cooking session in the kitchen goes well, you can make this a weekly or fortnightly activity, trying different recipes with increasing levels of difficulty.


3. Be organised

Before the actual day, read the recipe and make sure that you have everything you need, including all the tools and ingredients. If you have time and the recipe is one you are not too familiar with, do a trial run beforehand to make sure the recipe works and that everything will go smoothly on the actual day.

For younger kids, you may want to measure out all the ingredients before you begin, as they have a shorter attention span -- you want to be able to get straight down to business.

It will also be great if you can get kid-sized aprons and kitchen mitts for your kids. My kids love donning theirs whenever I tell them we're having a cooking/baking session. You can get reasonably priced ones from Daiso.


4. Give them guidance

Kids are fast learners, like sponges they absorb information quickly. Show them how to do a certain task, like mashing bananas or folding egg whites into the batter -- you will be surprised how quickly they learn.

In the kitchen, my 2-year old son will now automatically peel the banana and mash it, whenever handed one. He also instinctively knows to tear the basil leaves whenever we make Genovese pesto together, as well as which ingredients gets pounded first in the mortar and pestle.


5. Have fun

Cooking with your kids can be a very fulfilling and fun activity. Kids get a chance to be creative, for example when you make gingerbread cookies together. They can use their imaginations to decorate it however they wish. Make sure you have different cookie cutters to hand, so they can have fun experimenting with different shapes.

During Winter Solstice Festival (an important Chinese celebration) last year, we made tong yuen,a kind of glutinous rice flour Chinese dessert -- the kids had so much fun since it was just like playing PlayDoh, only better, because this was edible.

Your job is to supervise, encourage and get involved. Heap praises on a good job done, in the long run this will also help build your kids confidence.

Remember, even if things go wrong, it's okay. The most important thing is to have fun and enjoy your time in the kitchen together.


If you enjoyed reading my posts, LIKE me on Facebook! You can also follow me on Instagram (@babysumo) for more photo updates. Thanks :)

Thursday, March 20, 2014

Recipe: Baguette Bread and Butter Pudding

Baby D loves eating baguette, so whenever we go to the supermarket, he will ask us to buy the "his favorite bread" for him. Once, we bought 2 loaves and couldn't finish it (gone a bit hard/stale by Day 2), so Hubby told us that he would make a baguette bread and butter pudding for brunch. Dessert for brunch? - I like the sound of that! ;)

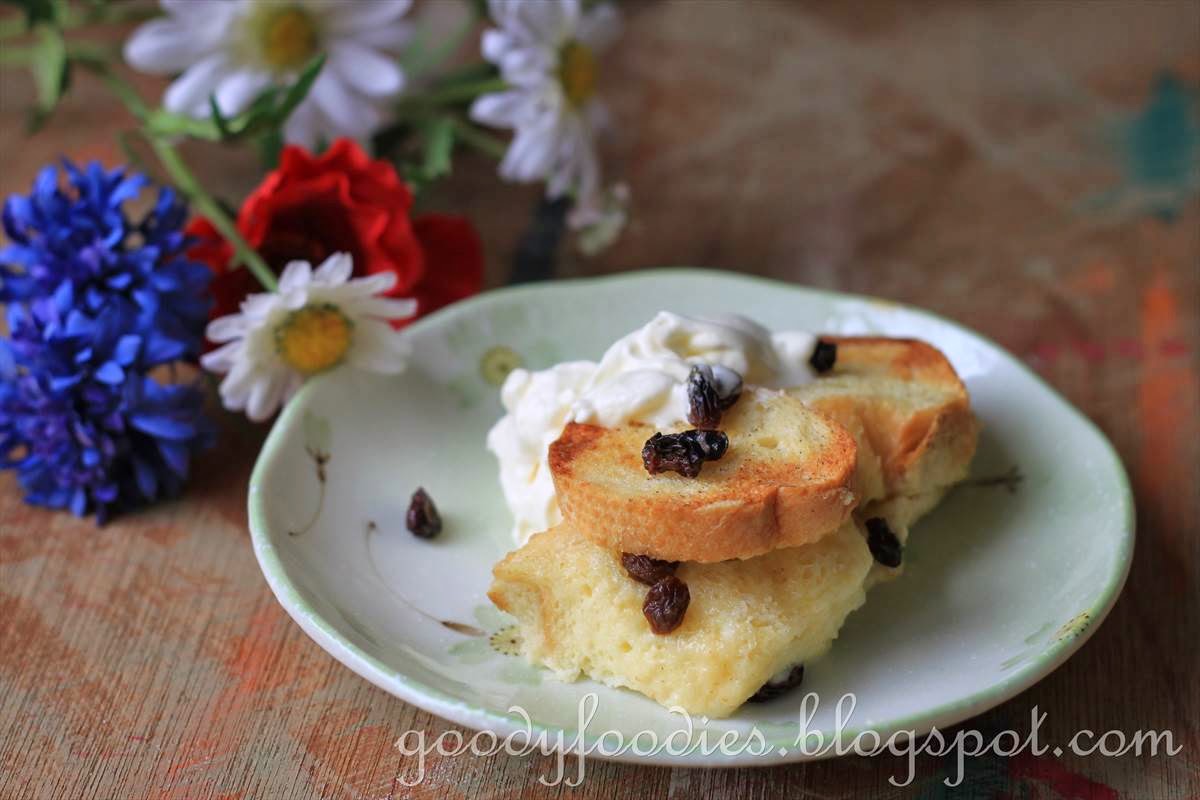
Baguette bread and butter pudding


The recipe he is using is my trusted Delia Smith rich bread and butter pudding recipe. The baguette is sliced to about 1cm thick, then layered in the baking dish, before the rich egg custard sauce is poured over. He added in some ground cinnamon and nutmeg too. We love having bread and butter pudding as soon as it comes out of the oven - the lovely smell of spices, warm crispy bread and a lovely custardy centre is the best! 


Good job Hubby, that's a very good likeness to Delia's :)


I have to say, after having this baguette version, I think I will use baguette in my future bread and butter pudding bakes. I really like the texture contrast between the top layer (very crispy) vs the softer, creamy bottom layer. Hubby served it with some whipped cream - a very indulgent brunch indeed :)


If you find yourself with stale bread, don't worry - just make bread and butter pudding!


Baguette bread and butter pudding
Recipe by Baby Sumo, adapted from Delia Smith
Preparation time: 15 minutes
Cooking time: 30-35 minutes
Serves 4-6

Ingredients
1 baguette, cut into 1cm thick slices
50g currants or raisins
275ml full cream milk
60ml whipping cream
50g caster sugar
3 eggs, beaten
1/4 tsp ground nutmeg
1/2 tsp ground cinnamon
Butter

To serve
Whipped cream, vanilla ice cream or pouring cream

1. Preheat oven to 180°C (no fan).

2. Butter a 1.2l enamel baking dish (one of the oblong kind). Well, I didn't have one of those so I just used a 24cm rectangular ovenproof dish.

3. Generously butter the baguette pieces, and then arrange one layer of buttered bread over the base of the baking dish and sprinkle half the currants/raisins over. Cover with another layer of bread slices and add the remainder of the currants/raisins.

4. In a measuring jug, measure out the milk and add the cream. Stir in the caster sugar until well dissolved, then whisk the eggs into the milk mixture. Mix the ground nutmeg and cinnamon. Pour the milk-egg mixture over the bread.

5. Bake in preheated oven for 30-35 minutes. Leave to cool for 5 mins and serve warm. You can serve it on its own or with some pouring cream, vanilla ice cream or a dollop of whipped cream.

Note: You can use any other stale bread to make this. You will need approximately 1 small loaf or 8 slices bread. 


I am submitting this to the "Cook Like a Star 2nd anniversay" event which is hosted by Zoe of Bake for Happy Kids, Joyce of Kitchen Flavours and Mich of Piece of Cake.


If you enjoyed reading my posts, LIKE me on Facebook! You can also follow me on Instagram (@babysumo) for more photo updates. Thanks :)

Tuesday, March 18, 2014

Recipe: Homemade Pork Tacos with an Asian Twist + WORLDFOODS giveaway

A taco is a traditional Mexican dish consisting of a corn or wheat tortilla with a variety of fillings, such as beef, pork, seafood, vegetables and cheese. Recently, we have been buying quite a lot of wholemeal tortilla (for our "pizza" bases) and Hubby saw on Instagram that we could also make hard-shell, U-shaped taco shells with them. Of course you can buy ready-made taco shells but they usually come in a box of 12s and it's hard to finish them all before they lose their crunchiness (and some are already broken while being transported around). 


Homemade Pork Tacos with an Asian Twist


The solution - make your own taco shells. It's really simple - just drape the tortilla sheet over 2 bars of your oven rack and bake for 7-8 minutes until crispy and hard. This way, you only make what you need. Since a whole tortilla sheet may be too big, you can opt to cut it in half before draping for daintier shells.


For the filling, we decided to give it an Asian twist, by stir frying the minced pork with the WORLDFOODS Thai green curry paste. We also topped it with scrambled eggs to add creaminess to the taco. Other garnishes include chopped cherry tomatoes, mozzarella cheese, parsley and some Asian pickled green chillies (you can also use jalapenos).

And what a delicious taco it was! Well-balanced textures and flavours - sweet, sour, salty, crunchy and creamy, all in one bite :). And such pretty colours too!


GIVEAWAY!
Thanks to WORLDFOODS, I have 2 bottles of this Thai green curry sauce to giveaway. All you need to do is leave a comment below stating "I want to enter this giveaway" with your name and e-mail address. This giveaway is open to Malaysia only. 2 winners will be drawn (1 bottle each) at random on 26 March 2014 and notified via email. Those who have entered previously can enter again :)

Note: WORLDFOODS products are food allergens free, trans-fat free and gluten free with no artificial preservatives, coloring or flavouring, as well as being suitable for vegetarians, vegans, coeliacs and Muslims. In KL, WORLDFOODS products are available at Village Grocer (Bangsar Village 1, Sunway Giza, Mt Kiara), Jaya Grocers (Intermark, Empire Shopping, Plaza Jelutong) and Hock Choon @ Ampang.


And the winners of the giveaway are: Winnie (No.11) and Emily Ang (No.6). Thanks to all who entered! Please reply to the email that I have sent to you.


Homemade Pork Tacos with an Asian Twist
Recipe by Baby Sumo
Preparation time: 10 minutes
Cooking time: 10-12 minutes
Serves 2

Ingredients
2 tortilla wraps or store-bought taco shells
200g minced pork (or chicken)
2 cloves garlic
1 1/2 tbsp cooking oil
1/8 tsp salt
2-3 tbsp WORLDFOODS Thai green curry paste

For the scrambled eggs
2 large eggs
1 tbsp butter
Salt and freshly ground pepper
1 tsp milk/cream

Garnish
2-3 tbsp pickled green chillies or Jalapeno
6-8 cherry tomatoes, chopped
3-4 tbsp grated mozzarella cheese
Fresh parsley, leaves plucked

1. Preheat oven to 190°C. Drape each tortilla over two bars of your oven rack and bake for about 7-8 minutes or until crispy.

Make your own taco shells! :)


2. Using a frying pan, heat cooking oil over medium high heat. Add garlic and fry for 2 minutes, until lightly browned. Add the minced pork and fry for about 5 minutes, until the pork is golden. Finally, stir in the WORLDFOODS Thai green curry paste and stir well for another minute until the pork is evenly coated. Taste, and season with salt as necessary. Set aside.

3. In a separate pan, break the eggs and add half the butter. Over medium low heat, use a spatula to stir the eggs to combine egg. Keep stirring (as you would when cooking a risotto - do not stop stirring). Add the remaining butter as the mixture begins to set. Do not let it get too hot, you will need to move the pan on and off the heat - about 2-3 times. The eggs will take about 3-4 minutes to cook. Add the milk/cream (it brings the temp of the eggs down hence stops the cooking process via residual heat) and season the eggs with salt and pepper.

4. To assemble, first place half the cooked minced pork (from Step 2) into each shell. Next, layer the cherry tomatoes, followed by the scrambled eggs (from Step 3). Top with mozzarella cheese, Asian pickled green chillies and fresh parsley. Tuck in!


If you enjoyed reading my posts, LIKE me on Facebook! You can also follow me on Instagram (@babysumo) for more photo updates. Thanks :)

*This recipe was featured on Asian Food Channel's FB page on 26 March 2014.

Monday, March 17, 2014

Tous Les Jours @ WOLO Hotel, Bukit Bintang, KL

We have been meaning to try Tous Les Jours, ever since they opened their first branch in Jalan Telawi, Bangsar last year. However, we always get drawn to Les Deux Garcons instead when we are in the vicinity. One day, after lunch at Marutama Ramen, we decided to pay a visit to Tous Les Jours outlet in the newly opened WOLO Hotel. 


Tous Les Jours, which means "everyday" in French is a French-Asian bakery. Established in 1997 in South Korea, TLJ has more than 1300 outlets in 8 countries from Korea to China to the USA. It serves a wide selection of breads, pastries, cakes and beverages. The outlet at WOLO also serves hot food.

This outlet has a really lovely ambiance - lots of natural lighting, high ceilings and nice design. Comfortable seating allows customers to sit back, relax and enjoy their food/drinks.The breads and pastries are nicely set out on counters, and it's self service - pick what you want and then pay at the counter. Order your drinks and cakes at the counter and they will bring it to your table.


Wonderful array of pastries


Our initial beverage choices were unavailable, but we finally settled for an organic cold chocolate (RM9) and a cold cafe cappuccino (rm9). I enjoyed the chocolate drink a lot, it was not too sweet and creamy. Yum.

I picked out the strawberry fresh cream cake (RM8.50) and Cream Soboro, also known as Korean streusel (RM3.80).  The cake was delicious, soft sponge cake with layers of cream and strawberry. We also enjoyed the Soboro, soft bread filled with custard and fresh cream.


The only disappointment was the Custard Cream Danish (RM3.90) which was described as "pastry filled with sweet custard cream". When we took our first bite, we expected to bite into cream but there was nothing. We queried this, and was told that the custard is baked into the pastry. Well, that's not how we read it - we suggested that they change their description as it is very misleading. Not good at all.


Cream Soboro


Breads


And here are our noodles from Marutama Ramen (at Fahrenheit 88) which we had for lunch earlier - super delicious! This is definitely ranked as one of my Top 3 Ramen places in KL. :) You can read our review here.


One of the best ajitama (flavored egg) around ;)


Tous Les Jours opening times: 8am to 11pm daily.

Price: Total bill RM38.95.

Location:  Tous Les Jours, WOLO Hotel, 126A-C, Jalan Bukit Bintang, 55100 Kuala Lumpur. (opposite Lot 10)

Tel: 03-4065 0088

GPS Coordinates: 3.147097, 101.711364


If you enjoyed reading my posts, LIKE me on Facebook! You can also follow me on Instagram (@babysumo) for more photo updates. Thanks :)

Sunday, March 16, 2014

Recipe: Jamie Oliver's Easy Flatbread

Last week, Hubby put in a request for chicken curry for dinner. No problem, I said, and I suggested that we also make flatbread to eat with the curry. I have bookmarked Jamie Oliver's easy flatbread recipe after seeing it on one of my blogger friends, Lian's blog.

Jamie Oliver's easy flatbread, served with my simple chicken curry


While I cooked the chicken curry, I delegated the task of making the flatbreads to Hubby :) Simply mix all the ingredients together and knead for 1 minutes, roll them out into rounds and they're ready to cook. The finished product looks similar to Indian naan, however this is much easier as no proofing and hardly any kneading is required and you can cook this in a griddle pan. I love the grill marks on these flatbreads. The flatbreads have a slightly chewy texture, which goes so well with my chicken curry. Once cooked, pile them up to retain the heat - these are best eaten warm.


I reckon these flatbreads would be great with some homemade hummus or soup too :)


Jamie Oliver's Easy Flatbread
Recipe adapted from Jamie Oliver 
Preparation time: 15 minutes
Cooking time: 12-15 minutes
Makes 12


Ingredients
350 g self-raising flour, plus extra for dusting
1 tsp sea salt
1 tsp baking powder
350 g natural yoghurt

Serve with:
Simple chicken curry


1. Add all the ingredients into a mixing bowl and mix together with a spoon, then use clean hands to pat and bring everything together.

2. Dust a clean work surface with flour, then tip out the dough.

3. Knead for a minute or so to bring it all together (this isn't a traditional bread recipe, so you don't need to knead it for long – just enough time to bring everything together).

4. Dust a rolling pin with flour, then divide the dough in half, then divide each half into 6 equal-sized pieces (roughly the size of a golf ball).

5. With your hands, pat and flatten the dough, then use a rolling pin to roll each piece into 12cm rounds, roughly 2mm to 3mm thick.

6. Use a knife to cut 6 lines into the centre of each round, leaving about 3cm at each end.

7. Place the griddle pan on a high heat, then once hot, cook each one for 1 to 2 minutes on each side, or until bar-marked and puffed up, turning with tongs. (I cooked them for about 1 1/4 mins each side, you can cook two at one time)

8. Pile the flatbreads onto a serving board so everyone can dig in and help themselves. I served them with chicken curry (recipe here).


I am submitting this to the "Cook Like a Star 2nd anniversay" event which is hosted by Zoe of Bake for Happy Kids, Joyce of Kitchen Flavours and Mich of Piece of Cake.


If you enjoyed reading my posts, LIKE me on Facebook! You can also follow me on Instagram (@babysumo) for more photo updates. Thanks :)

Saturday, March 15, 2014

Recipe: Roselle juice (Homemade "Ribena" drink)

The weather in KL recently has been super hot, and coupled with the haze, we find ourselves more vulnerable and easily falling sick. It is important to eat lots of fresh fruits and vegetables as well as drinking lots of water to boost our immune system and keep ourselves healthy.


Roselle is high in vitamin C and anthocyanins. We managed to harvest a large amount of roselle calyx from our garden, so I made roselle juice for my kids once every couple of days - so happy!


I used to add caster sugar to sweeten the juice (and some honey later on), but I have recently switched to using rock sugar 冰糖 (which the Chinese believe to have medicinal properties), and the resulting roselle juice tastes just like Ribena. It is slightly sweeter than my other version (using caster sugar), however I have to say this tastes a lot nicer. It is important not to boil it for too long, or else the juice will taste quite concentrated and sour.


Please see this post for my roselle jam recipe.


Roselle juice (Homemade "Ribena" drink)
Recipe by Baby Sumo
Preparation time: 10 minutes
Cooking time: 15-20 minutes
Makes 2l

Ingredients
20 roselle calyx
80-100g rock sugar 冰糖
2l water


1. Firstly, peel the seed out of the calyx. You can just use your fingers but be careful as some parts of the seeds are prickly.

2. Place roselle and water in a large pot and boil over medium high heat for 15-20 minutes. The longer you boil it, the more concentrated the juice will taste.

3. Stir in sugar, to taste. Once dissolved, remove from heat.

4. Allow to cool to room temperature, then chill in fridge and serve with lots of ice cubes.


If you enjoyed reading my posts, LIKE me on Facebook! You can also follow me on Instagram (@babysumo) for more photo updates. Thanks :)